Threadless labrets are awesome for various piercing locations because you only need one backing for multiple different tops. It’s super easy to change out your look on a whim, and they stay in securely as long as you bend the pin correctly.
Table of Contents
- What is threadless body jewelry?
- How do you use a threadless labret?
- My top feels loose or is falling out - how do I fix it?
- How do you insert a threadless labret in a nose piercing?
What is threadless body jewelry?
Threadless tops are secured into the backing with tension once they have been bent. They do not have a screw on the back side or any other type of locking mechanism - it’s just a thin, straight pin that fits inside of a hollow portion of a backing.
The most common type of threadless backing is a labret, which can be used for various ear piercings (tragus, conch, helix, and lobe) and nose piercings. You can also find straight and curved threadless bars. The threadless jewelry system is very simple to use once you get the hang of it!
The most important thing to keep in mind when you’re purchasing threadless body jewelry is that the gauge of the pin on the back side of the top matches the gauge that the backing accepts (otherwise the pin won’t fit inside the hole).
Not all labrets will fit the same thickness of pin, so make sure you check for that information before ordering. The tops that I make have a 25 gauge pin on the back, which is pretty standard for threadless jewelry.
How do you use a threadless labret?
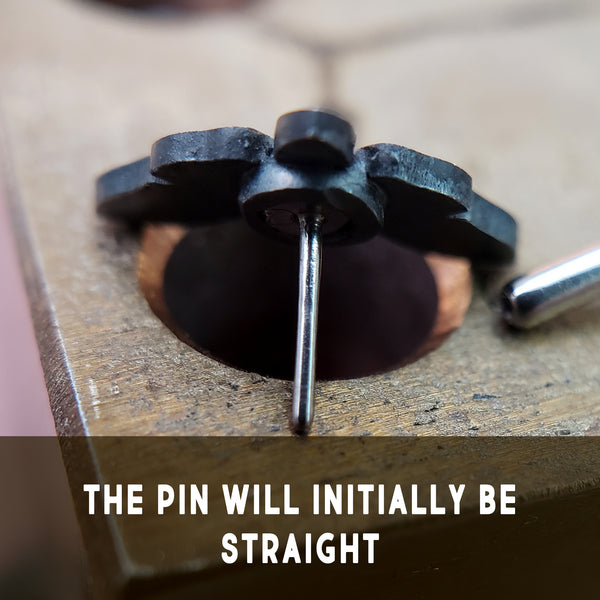
When you first get your top the pin on the back side will be straight. To create the tension that will hold the top inside of the backing, you will need to slightly bend the pin.
To bend the pin, first insert it into the backing approximately one-third to one-half the length of the pin.

Next, create a bend in the pin by slightly pushing the top over the edge of the backing.

Now, you’re ready to insert the jewelry. The labret backing goes in from the back side of your piercing, then the pin is inserted into the top of the labret and pushed fully into the hole. As long as you created enough of a bend in the pin, then the top will feel secure if you give it a slight tug at this point.

Once the jewelry is in, you’ll be able to wear it securely until the next time that you want to change the top out for a different look. To remove the top, simply hold onto the backing with one hand and pull out the top with your other hand.
My top feels loose or is falling out - how do I fix it?
If the top doesn’t feel secure when you slightly tug on it, then you just need to remove the pin and bend it a little bit more. The key word here is slight! If you pull on it the top will come out because that’s what it is designed to do, but with the proper bend there will be enough tension to keep it snug against a slight tug. Remember, the bend is what is creating the tension when you insert the pin inside of the hollow part of the labret backing.
How do you insert a threadless labret in a nose piercing?
Labret studs are super comfy to wear in nose piercings because they have a flat disc back that won’t flip around like a nose screw or L-bend does. However, the drawback is that inserting them is a pain in the butt because they go in from the back side of your piercing (or in other words, the inside of your nose).
Get yourself an appropriately sized pin taper to make the process much, much easier - they are also called insertion tapers.
Pin tapers are long, straight bars that step down to the pin gauge at the very tip so that a threadless labret can be inserted onto the taper so it can be easily pulled through the piercing. They come in different thicknesses, and they are the same gauge throughout the entire taper except for that tiny pin at the tip for the backing. The part that steps down to the pin size needs to match the pin gauge that your labret accepts, and the gauge of the overall pin taper needs to match your piercing.

First, insert the insertion taper (starting with the pin side) into your nose piercing from the front side of your piercing (outside of the nostril). Please keep in mind that my picture example is an extremely exaggerated angle - I’m trying to hold the taper in place with one hand while I’m taking a picture with the other. Never angle the taper in a way that is painful.

Next, insert the tip of the pin taper into the hollow part of the threadless labret. Again, this is an extremely exaggerated angle.

Then, while holding onto the labret to keep it from falling off the taper, slowly pull the taper back through your piercing until you can see the end of the labret showing.

Now you’re ready to put your tops in! Just stabilize the back side of the labret with your thumb, and push the pre-bent top into the top of the labret that’s sticking out of the front side of your piercing.
